[RabbitMQ] 基本教學
開始基本教學之前請先安裝RabbitMQ, 各平台的安裝請參考, 假如你跟我一樣懶得自己按部就班安裝可以使用docker快速布署, 請參考. (可以先簡單的安裝附帶web管理介面的版本, 我自己是安裝 3.7.2-management)
聲明列隊:
第一個參數是列隊的名稱, 這邊是採用默認的交換器, routing key 為列隊名稱, 剩餘參數之後會再開新帖說明, 我們在這邊先了解基本概念就好.
發送消息:
消息是基於二進制的, 所以理論上你可以發送任何數據到列隊之中, 這邊同樣的是指定默認交換器(第一個參數)與hello列隊名做為routing key.
假如你的RabbitMQ有裝web管理介面的插件就可以看到發送消息後已經有消息進入列隊中等待消費者接收.

聲明列隊:
呼叫basicConsume監聽列隊, 第一個參數是列隊名稱, 第二個參數代表是否自動確認接收狀況, 第三個是接收訊息的call back function, 屬於非同步式.
執行消費者後可觀察到消費者有收到列隊傳送的資料

下面給出完整程式碼
2018/01/01 VictorHsiao
RabbitMQ是什麼?
RabbitMQ是一個訊息中介軟體 (broker), 他就像郵局一樣的存在, 主要用來處理應用程序之間消息的儲存與轉發, 消息是基於二進制的, 這意味著你的消息不見得是純文字.
RabbitMQ是AMQP標準的實作, 特點是消息轉發是非同步的, 並且可靠.
名詞解釋
生產者 (Producer): 為訊息產生的一方, 訊息由生產者產生並發送 (producing)至RabbitMQ.
消費者 (Consumer): 為接收訊息後展開處理的一方.
消息列隊 (Queue): RabbitMQ比喻為郵局的話Queue就是郵桶, 負責列隊 (先進先出)收到的消息.
交換器 (Exchange): 當想要將消息投遞到列隊時通過把消息發送到交換器來完成, 根據確定的規則RabbitMQ會決定該將消息投遞到哪個列隊.
路由鍵 (Routing Key): 當把消息投遞到MQ時訊息會夾帶一個路由鍵, 交換器負責將其與對應的列隊進行匹配, 如果匹配那消息就會投遞到該列隊中.
首先創建一個maven專案, 在pom中新增rabbitmq依賴.
交換器 (Exchange): 當想要將消息投遞到列隊時通過把消息發送到交換器來完成, 根據確定的規則RabbitMQ會決定該將消息投遞到哪個列隊.
路由鍵 (Routing Key): 當把消息投遞到MQ時訊息會夾帶一個路由鍵, 交換器負責將其與對應的列隊進行匹配, 如果匹配那消息就會投遞到該列隊中.
交換器類型
一共有4種類型, direct、fanout、topic與headers. 每一種類型都實現了不同的路由規則, 先介紹direct類型就好, 其他類型之後再開新帖介紹.
direct交換器非常簡單, 規則如下:
假如路由鍵匹配列隊的話消息就被投遞到對應的列隊之中.
假如路由鍵匹配列隊的話消息就被投遞到對應的列隊之中.
RabbitMQ包含一個空白字串名稱的默認交換器, 當宣告一個列隊時會自動綁定到默認交換器, 並以列隊名稱作為路由鍵.
消息投遞流程
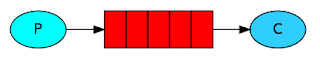
生產者產生消息-->發送至RabbitMQ-->交換器-->解析routing key找到對應的列隊-->投遞至對應列隊-->消費者接收訊息-->處理訊息
理論的部分到此為止, 接下來直接來實作一個下圖的範例

首先創建一個maven專案, 在pom中新增rabbitmq依賴.
用的是5.1.1算是蠻新的
 <dependency>
      <groupId>com.rabbitmq</groupId>
      <artifactId>amqp-client</artifactId>
      <version>5.1.1</version>
 </dependency>
生產者
與RabbitMQ建立連線: ConnectionFactory factory = new ConnectionFactory();
factory.setHost("localhost");
Connection connection = factory.newConnection();
聲明列隊:
Channel channel = connection.createChannel();
channel.queueDeclare("hello", false, false, false, null);
第一個參數是列隊的名稱, 這邊是採用默認的交換器, routing key 為列隊名稱, 剩餘參數之後會再開新帖說明, 我們在這邊先了解基本概念就好.
發送消息:
channel.basicPublish("", "hello", null, message.getBytes()); 消息是基於二進制的, 所以理論上你可以發送任何數據到列隊之中, 這邊同樣的是指定默認交換器(第一個參數)與hello列隊名做為routing key.
假如你的RabbitMQ有裝web管理介面的插件就可以看到發送消息後已經有消息進入列隊中等待消費者接收.

消費者
同樣的需要與RabbitMQ建立連線
 ConnectionFactory factory = new ConnectionFactory();
 factory.setHost("localhost");
 Connection connection = factory.newConnection();
 Channel channel = connection.createChannel();
 channel.queueDeclare("hello", false, false, false, null);
channel.basicConsume("hello", true, consumer);
 com.rabbitmq.client.Consumer consumer = new DefaultConsumer(channel) {
                          @Override
                          public void handleDelivery(String consumerTag, Envelope envelope, AMQP.BasicProperties properties,
                                    byte[] body) throws IOException {
                               String message = new String(body, "UTF-8");
                               System.out.println(name + " receive message: " + message + " Thread ID: "
                                         + Thread.currentThread().getId());
                               try {
                                    Thread.currentThread().sleep(1000);
                                    // 模擬做很繁重的工作
                               } catch (InterruptedException e) {
                                    e.printStackTrace();
                               }
                          }
                     };
執行消費者後可觀察到消費者有收到列隊傳送的資料

下面給出完整程式碼
 package com.rabbitmq.test;
 import java.io.IOException;
 import com.rabbitmq.client.AMQP;
 import com.rabbitmq.client.Channel;
 import com.rabbitmq.client.Connection;
 import com.rabbitmq.client.ConnectionFactory;
 import com.rabbitmq.client.DefaultConsumer;
 import com.rabbitmq.client.Envelope;
 public class HelloRabbitMQ {
      private static Object obj = new Object();
      private static abstract class EndPoint {
           protected String QUEUE_NAME = "hello";
           protected Connection getConnection(String host) throws Exception {
                ConnectionFactory factory = new ConnectionFactory();
                factory.setHost(host);
                return factory.newConnection();
           }
      }
      private static class Consumer extends EndPoint implements Runnable {
           private Connection connection = null;
           private Channel channel = null;
           private String name;
           public Consumer(String host, String name) throws Exception {
                connection = getConnection(host);
                this.name = name;
           }
           public void run() {
                try {
                     channel = connection.createChannel();
                     channel.queueDeclare(QUEUE_NAME, false, false, false, null);
                     com.rabbitmq.client.Consumer consumer = new DefaultConsumer(channel) {
                          @Override
                          public void handleDelivery(String consumerTag, Envelope envelope, AMQP.BasicProperties properties,
                                    byte[] body) throws IOException {
                               String message = new String(body, "UTF-8");
                               System.out.println(name + " receive message: " + message + " Thread ID: "
                                         + Thread.currentThread().getId());
                               try {
                                    Thread.currentThread().sleep(1000);
                                    // 模擬做很繁重的工作
                               } catch (InterruptedException e) {
                                    e.printStackTrace();
                               }
                          }
                     };
                     channel.basicConsume(QUEUE_NAME, true, consumer);
                     synchronized (obj) {
                          obj.wait();
                     }
                } catch (Exception e) {
                     e.printStackTrace();
                } finally {
                     try {
                          if (channel != null)
                               channel.close();
                          if (connection != null)
                               connection.close();
                     } catch (Exception e) {
                          e.printStackTrace();
                     }
                }
           }
      }
      private static class Producer extends EndPoint implements Runnable {
           private Connection connection = null;
           public Producer(String host) throws Exception {
                connection = getConnection(host);
           }
           public void run() {
                Channel channel = null;
                try {
                     channel = connection.createChannel();
                     channel.queueDeclare(QUEUE_NAME, false, false, false, null);
                     for (int i = 0; i < 9; i++) {
                          channel.basicPublish("", QUEUE_NAME, null, ("" + i).getBytes());
                          System.out.println("Producer Sent " + i);
                          Thread.sleep(30);
                     }
                } catch (Exception e) {
                     e.printStackTrace();
                } finally {
                     try {
                          if (channel != null)
                               channel.close();
                          if (connection != null)
                               connection.close();
                     } catch (Exception e) {
                          e.printStackTrace();
                     }
                }
           }
      }
      public static void main(String[] args) throws Exception {
           String host = "192.168.1.103";
           Thread consumerThread1 = new Thread(new Consumer(host, "consumerThread1"));
           Thread producerThread = new Thread(new Producer(host));
           producerThread.start();
           Thread.sleep(2000);
           consumerThread1.start();
           System.out.println("Finish");
      }
 }
2018/01/01 VictorHsiao

留言
張貼留言